Washing a hat in the dishwasher sounds counterintuitive, and for many hats, it absolutely is. But certain caps, visors, and structured hats clean up beautifully in a standard cycle, emerging fresh without the hand-scrubbing hassle. The key is knowing which hats can handle the heat and water pressure, prepping correctly, and letting gravity do the work. This guide walks you through the entire process, from identifying dishwasher-safe headwear to drying and reshaping so your favorite hats stay in rotation for years. If you’ve been hesitant about tossing a grimy baseball cap in with the dishes, here’s exactly how to do it right.
Table of Contents
ToggleKey Takeaways
- Washing a hat in the dishwasher works best for structured cotton caps, synthetic blends, and athletic hats, but avoid wool, leather, felt, and delicate fabrics.
- Always use a hat cage or mesh laundry bag to maintain shape and prevent tumbling during the dishwasher cycle.
- Run a standard warm cycle with regular dishwasher detergent, skipping heat-dry features to give yourself control over the final shape and condition.
- Reshape your hat while it’s still slightly damp after the cycle, smoothing the bill and crown by hand for optimal results.
- Air-dry the hat completely in a well-ventilated area away from direct sunlight, which typically takes 4–6 hours indoors.
Why the Dishwasher Works for Hat Cleaning
A dishwasher does three things efficiently: it applies heat, detergent, and water pressure to cut through dirt and oils. For hats made from synthetic materials or sturdy cotton blends, this combination removes sweat stains, dust, and odors without the agitation of a washing machine or the labor of hand-scrubbing. The spray jets target all angles, something a brush or sponge can’t easily do.
The real advantage is speed and consistency. A full dishwasher cycle takes about 2 hours, and you’re using water and energy you’d already spend anyway. Hand washing a hat requires 10–15 minutes of active work and often leaves soap residue or uneven drying. A dishwasher delivers predictable results once you’ve done it once.
Hot water is also an ally here. Dishwashers typically run at 130–140°F, which helps dissolve detergent and sanitize. This temperature is high enough to kill odor-causing bacteria yet low enough that it won’t damage synthetic materials or shrink most cotton-blend hats. Just keep in mind, this isn’t suitable for delicate fabrics.
Which Hats Are Dishwasher-Safe
Not every hat belongs in the dishwasher. Wool, leather, felt, silk-lined, or hand-blocked hats will degrade, shrink, or lose shape. Vintage or heirloom pieces should stay far away. So should fedoras, wide-brimmed hats, or anything with glued-on embellishments.
What does work: structured cotton caps (baseball caps, trucker hats, visors), synthetic blends, polyester mesh backs, and most athletic or outdoor hats. Check the care tag first, if it says “machine wash,” the dishwasher is usually fine. If it says “hand wash only” or “dry clean,” respect that.
A quick test: dampen a small, inconspicuous corner with warm water and see if color bleeds or the material softens. If it passes, you’re likely good to go. When in doubt, the safest bet is hand washing in warm soapy water for 5 minutes, then air drying flat. That said, thousands of DIYers successfully dishwasher-clean athletic hats without issue year after year.
Another consideration is interior branding or printed logos. Heavy embroidery, screen printing, or rubber logos sometimes wear faster under dishwasher heat, so inspect those spots before committing.
Step-by-Step Dishwasher Cleaning Process
Preparing Your Hat for the Dishwasher
Start by removing loose dirt. Bang the hat gently against your hand or use a soft brush to dislodge dust and debris, this prevents your filter from clogging and keeps the water cleaner for other dishes if you’re running a mixed load. If the hat has a removable foam or plastic insert in the sweatband, pop it out now: it can warp under heat.
Rinse the hat under cool tap water for 15–20 seconds, targeting the sweatband and bill where sweat oils concentrate. You’re not washing here, just pre-rinsing to reduce the detergent load and help the dishwasher do its job more effectively.
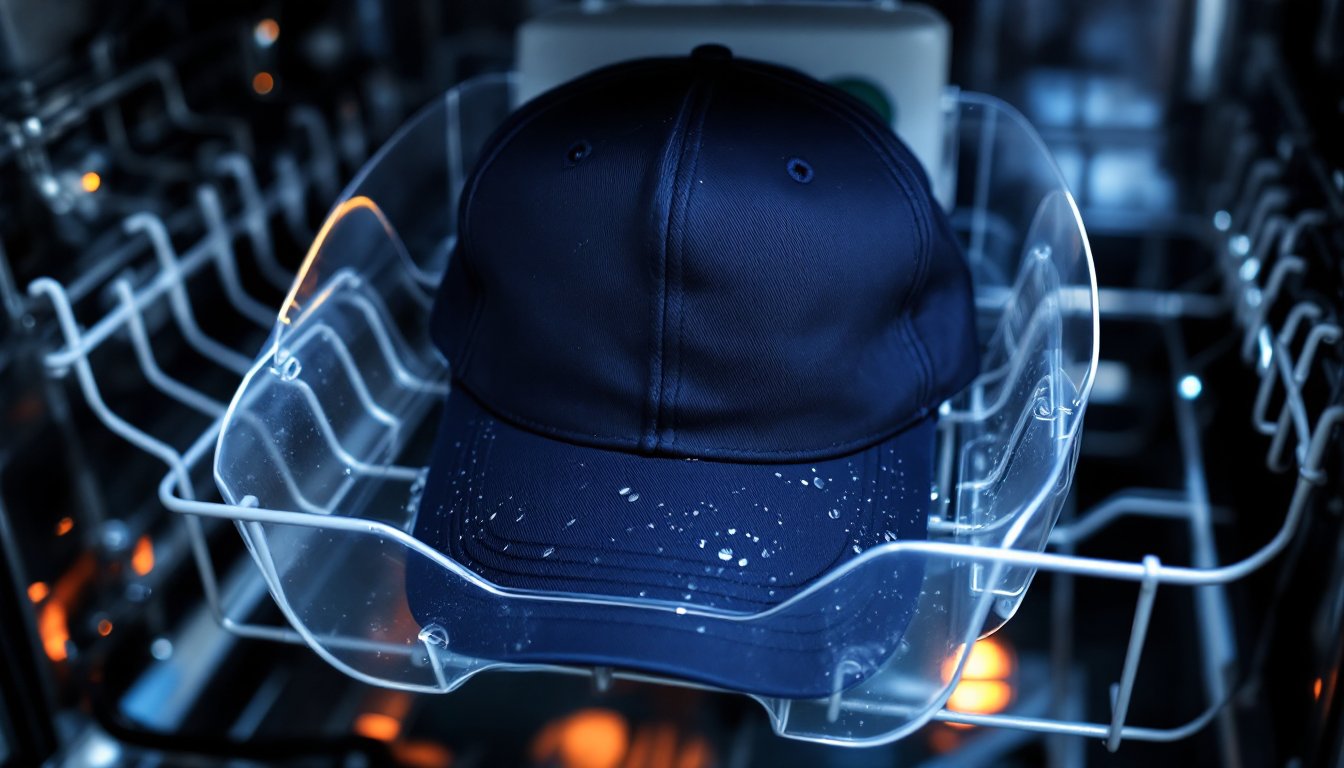
Place the hat in a hat cage or mesh laundry bag. This is not optional if you want the hat to keep its shape. The cage (a specialized dishwasher accessory shaped like a basket) holds the cap upright and keeps it stable during spray cycles. Most hardware or home goods stores carry these for $10–20, and they last forever. Without one, the hat tumbles around, risking damage and poor cleaning.
If you don’t have a cage, you can improvise with a sturdy mesh produce bag, but the commercial cages are purpose-built and worth the small investment. Place the caged hat on the bottom rack of your dishwasher, away from the heating element and spray arm.
Add a regular dishwasher detergent tablet or powder, don’t use extra or an aggressive formula meant for pots and pans. Standard detergent (like the kind used for everyday dishes) has enough surfactants to lift oils without being harsh. If the hat has heavy odor from sweat, add a second tablet, but skip this if it’s just dusty.
Running the Dishwasher Cycle
Select a warm or normal cycle, not the sanitize or heavy-duty setting. Most dishwashers have a standard 2-hour cycle that runs at moderate temperature (130–140°F) and includes a heated drying phase. Some machines offer a “delicate” or “china” setting, which is gentler: use that if available.
Skip the heat-dry feature if you can. Open the door and air-dry instead. This prevents any unwanted heat exposure and gives you control over the hat’s final shape. If the machine auto-locks after the cycle ends, check it after 30–45 minutes.
Don’t wash the hat alone, run it with a normal load of dishes to save water and energy. There’s no risk of color transfer or damage from other items as long as the hat is secured in its cage. Just avoid washing the hat with anything fragrant (candles, soaps) if you prefer your hat unscented.
Drying and Reshaping Your Hat
Remove the hat while it’s still slightly damp (not soaking, but with visible moisture in the cotton). Trying to reshape a dry hat is harder: damp material is more pliable.
On a flat surface, a clean towel, a drying rack, or even a salad bowl placed upside down, set the hat and gently smooth the bill and crown with your hands. If it’s a baseball cap, pull the bill straight out to its original curve. If it’s a trucker hat, make sure the mesh panels aren’t twisted. Spend 30 seconds checking the overall shape while the material is still warm and receptive.
Allow the hat to air-dry completely in a well-ventilated area away from direct sunlight (UV can fade colors). This typically takes 4–6 hours indoors, or overnight if humidity is high. The sweatband inside may take longer, so don’t rush this step. Putting on a damp hat or storing it wet invites mold.
Once dry, the sweatband and crown should feel firm and hold their shape. If the hat feels slightly stiff (common with synthetic fabrics), wear it for an hour or two, normal movement will soften it back. Store the hat on a shelf or in a closet (not in a vacuum-sealed bag), and you’re set.
For hats with visible mineral deposits from hard water, a second rinse under cool tap water before the dishwasher cycle helps. Some people add a rinse aid to the dishwasher for spotless results, which is perfectly fine for hats.
Conclusion
Washing a hat in the dishwasher works when you match the method to the material. Stick to synthetic and sturdy cotton hats, use a hat cage or mesh bag, run a normal cycle with standard detergent, and reshape while damp. You’ll get a cleaner hat with less effort than hand washing, and your favorite caps stay fresh for another season. Start with one hat to build confidence, and you’ll likely make it a regular habit.